
springweb自动配置分析及flyway插件使用

springboot 创建web项目只需要引入对应的web-starter,自己定义好moudel层,再采用相应的模版引擎技术(view层)就可以将数据渲染到模版中,从而生成一个单体的web应用!那这些视图是如何解析的呢?最常用的模版引擎语法有哪些呢?
新建一个空的项目,我们选择对应的web依赖,工具相关我三个都勾选上,数据库驱动选mysql驱动!具体见我的另一篇博客:springboot集成mybatis和druid监控
此处不再赘述:
创建好项目后,我们来分析下源码:
分析源码
首先我们都知道,springboot初始化的项目下面都是没有webapp这样一个模块的,那我们的web相关的一些资源,该放在哪里呢?为何对应的放置就可以生效呢?
我们尝试从源码中寻求答案
SpringMVC 整个 SSM 都是基于它的,所以我们第一步应该去研究 SpringBoot 关于Mvc的自动配置!
- 1、所有mvc相关的配置都在 WebMvcAutoConfiguration (视图解析器、静态资源过滤!)
- 2、addResourceHandlers 静态资源处理方法我们一句句的解读,就可以读懂源码!可以看到这段源码中就这个webjars我们不怎么熟悉
1
2
3
4
5
6
7
8
9
10
11
12
13
14
15
16
17
18
19
20
21
22
23
24
25
26
27
28
29
30
31
32
33
34
35
36
37
38
public void addResourceHandlers(ResourceHandlerRegistry registry) {
//禁用默认规则的一个配置,如果你手动的添加了资源映射路径的配置,那么这些自动配置就会直接失效!
if (!this.resourceProperties.isAddMappings()) {
logger.debug("Default resource handling disabled");
return;
}
// 缓存控制
Duration cachePeriod = this.resourceProperties.getCache().getPeriod();
CacheControl cacheControl = this.resourceProperties.getCache().getCachecontrol().toHttpCacheControl();
// 分析源代码,需要掌握看对象的方法调用!
// localhost:8080/webjars/jquery.js
// 判断是否存在一个映射路径 /webjars/**,
// addResourceHandler 处理逻辑 /webjars/a.js
// addResourceLocations 处理资源的地址 classpath:/META-INF/resources/webjars/a.js
if (!registry.hasMappingForPattern("/webjars/**")) {
customizeResourceHandlerRegistration(registry.addResourceHandler("/webjars/**")
.addResourceLocations("classpath:/META-INF/resources/webjars/")
.setCachePeriod(getSeconds(cachePeriod)).setCacheControl(cacheControl));
}
// 获取静态资源路径!
String staticPathPattern = this.mvcProperties.getStaticPathPattern(); // localhost:8080/
// 如果访问映射的路径是 staticPathPattern = "/**";
// this.resourceProperties.getStaticLocations())
if (!registry.hasMappingForPattern(staticPathPattern)) {
customizeResourceHandlerRegistration(registry.addResourceHandler("/**")
.addResourceLocations(getResourceLocations(this.resourceProperties.getStaticLocations()))
.setCachePeriod(getSeconds(cachePeriod)).setCacheControl(cacheControl)); }
}
// 对应的资源加载先后顺序 优先级:META-INF > resources > static > public
// 对于怎么验证这个优先级,可以建对于的文件加,放些静态资源,页面直接访问测试
private static final String[] CLASSPATH_RESOURCE_LOCATIONS =
{
"classpath:/META-INF/resources/",
"classpath:/resources/",
"classpath:/static/",
"classpath:/public/"
};
webjars
什么是 webjars?
webjars是一个前端依赖管理工具,集成了前端主流的一些框架,使得我们只需引入对应的jar包就可以在项目中使用它!
我们引入jquery的依赖:
1 | <dependency> |
看下生成的依赖: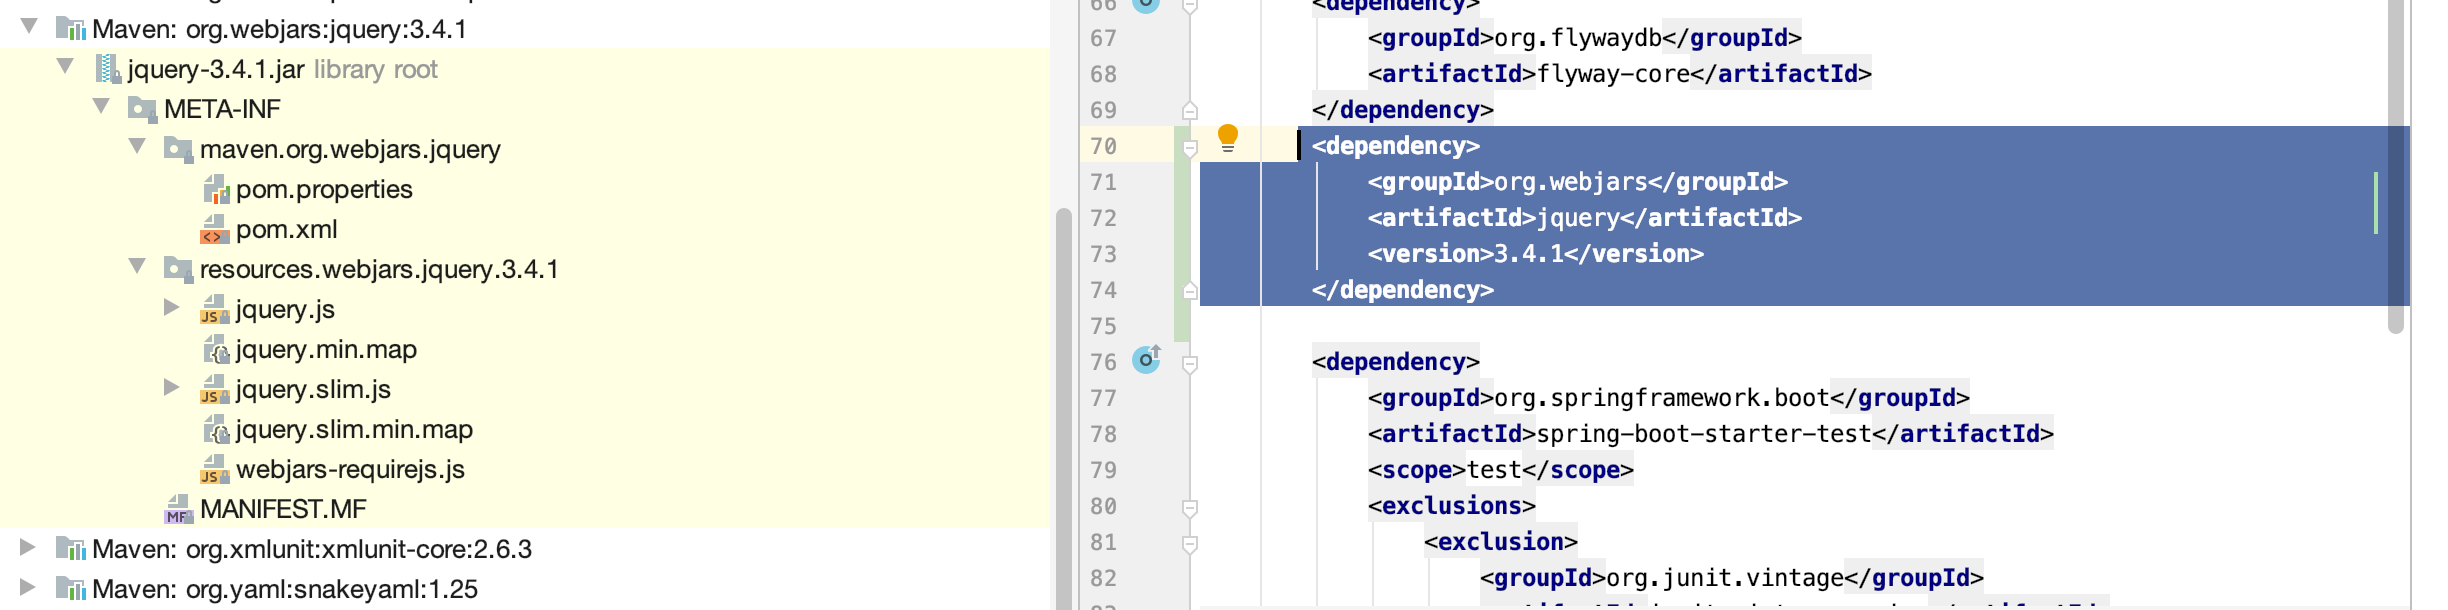
我们看下是否可以直接通过路径访问:http://localhost:8080/webjars/jquery/3.4.1/jquery.js 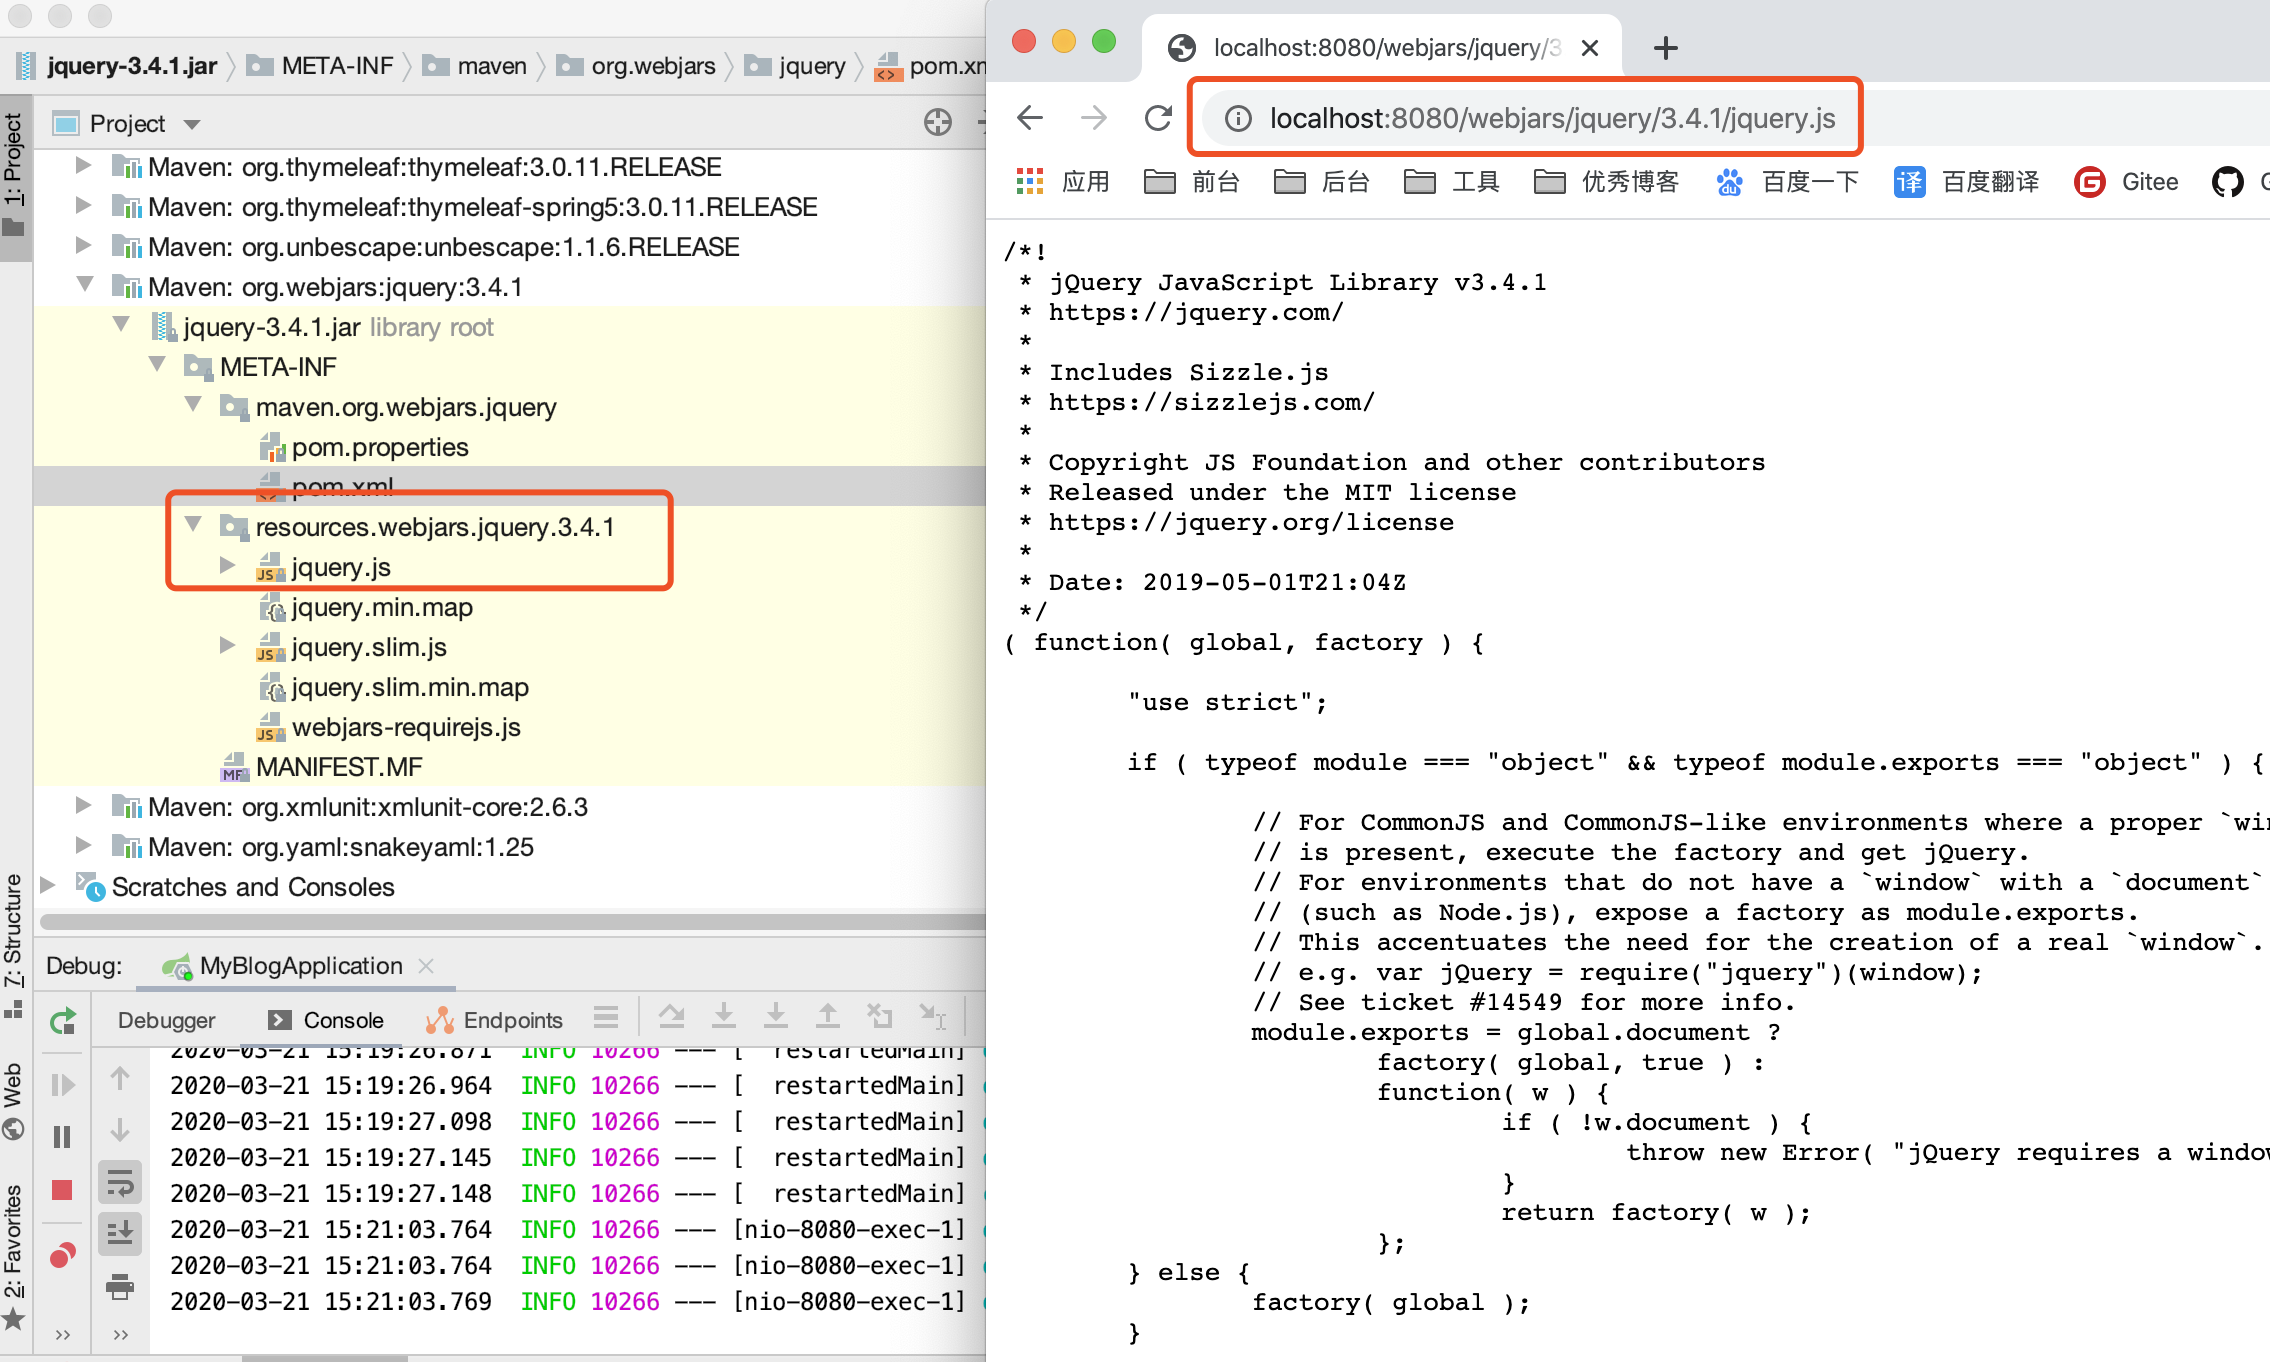
很明显,这样是可以直接访问的。那这些可以常用的框架等静态资源我们可以这样引入,我们自定义的东西例如css 图片等该如何使用呢?
我常用的规则推荐如下:
1 | private static final String[] CLASSPATH_RESOURCE_LOCATIONS = |
当然我们也可以更改spring的默认资源路径配置:
1 | # 一旦自己配置了 那么默认的就会失效 |
thymeleaf
- 1.官网:https://www.thymeleaf.org/documentation.html
- 2.github:https://github.com/thymeleaf/thymeleaf/blob/3.0-master
引入依赖,在spring中采用jar一般都是使用对应的starter
1 | <dependency> |
任何starter都有一个xxxProperties 我们去其依赖下看看源码:
1 | public class ThymeleafProperties { |
可以看出thymeleaf的默认配置路径是templates下,默认文件格式是html的
我们要改只需要spring.thymeleaf.prefix=xxx,当然更改了默认的便不会生效了。
测试thymeleaf
templates新增一个页面test.html
1 |
|
controller中新增一个接口:
1 | package com.blog.controller; |
启动项目可见: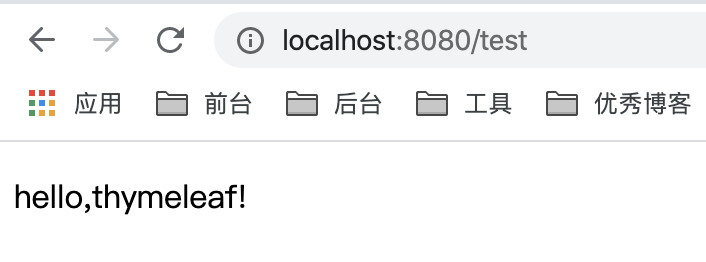
thymeleaf语法
了解了基本的页面渲染规则后,我们来看下thymeleaf的语法: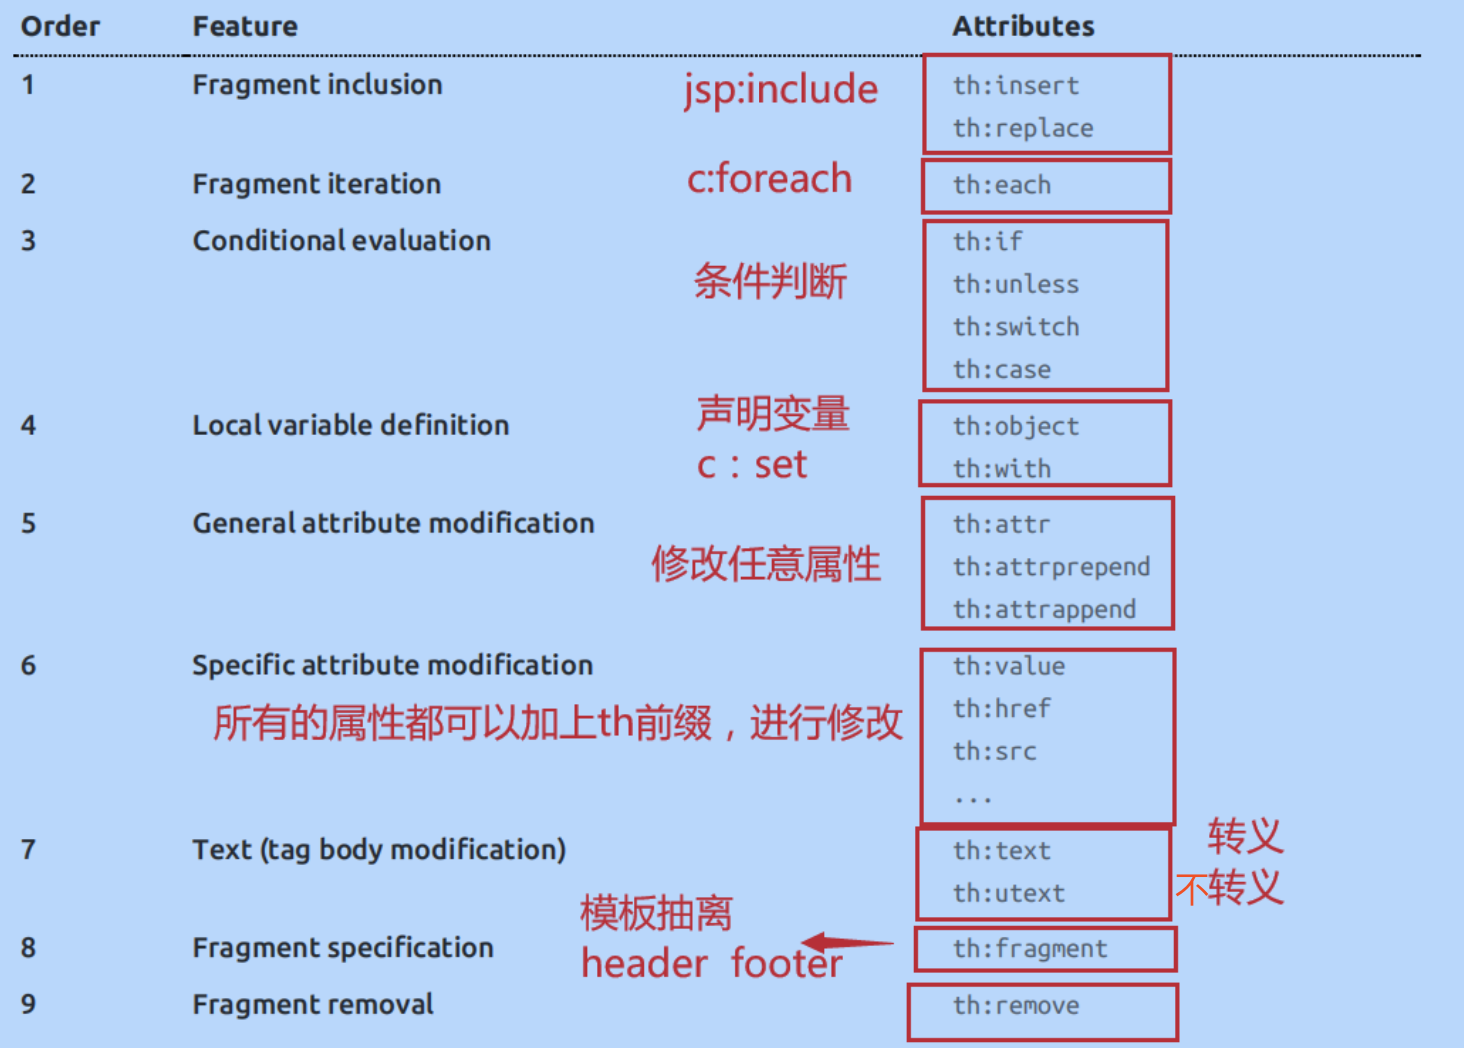
我们还可以编写哪些表达式呢?
Variable Expressions: ${…} 获取一些基本的变量值! OGNL;
- 对象的属性,调用方法
- 使用内置的基本对象
1
2
3
4
5
6${#ctx.locale}
${param.foo}
${session.foo}
${application.foo}
${#request.getAttribute('foo')}
${#servletContext.contextPath} - 工具对象4.其他
1
2
3
4
5
6
7${#messages.msg('msgKey')}
${#uris.escapePath(uri)}
${#conversions.convert(object, 'java.util.TimeZone')} ${#dates.format(date, 'dd/MMM/yyyy HH:mm')} ${#calendars.format(cal)}
${#numbers.formatInteger(num,3)}
${#strings.toString(obj)}
${#arrays.toArray(object)}
.....1
2
3
4
5
6
7
8
9
10
11
12
13
14
15
16
17
18
19
20
21
22
23
24
25
26
27Selection Variable Expressions: *{...} 选择表达式,和 ${} 是一样的;
Message Expressions: #{...} 国际化内容获取!
Link URL Expressions: @{...} URL表达式;th:href=“@{/login}”
Fragment Expressions: ~{...} 组件化表达式;
Literals (字面量)
Text literals: 'one text' , 'Another one!' ,... (字符串)
Number literals: 0 , 34 , 3.0 , 12.3 ,...
Boolean literals: true , false
Null literal: null
Literal tokens: one , sometext , main ,...
Text operations: (文本操作)
String concatenation: +
Literal substitutions: |The name is ${name}| Arithmetic operations: (数学运算)
Binary operators: + , - , * , / , %
Minus sign (unary operator): -
Boolean operations: (布尔运算)
Binary operators: and , or
Boolean negation (unary operator): ! , not
Comparisons and equality: (比较运算)
Comparators: > , < , >= , <= ( gt , lt , ge , le )
Equality operators: == , != ( eq , ne )
Conditional operators: (条件运算符)
If-then: (if) ? (then)
If-then-else: (if) ? (then) : (else)
Default: (value) ?: (defaultvalue)
Special tokens:
Page 17 of 104**No-Operation:** _
springmvc 启动配置原理
我们来看官方文档,虽然都是英文但是不要怂,慢慢的翻的多了也就认识了!
地址:官网
找到对应的Spring MVC Auto-configuration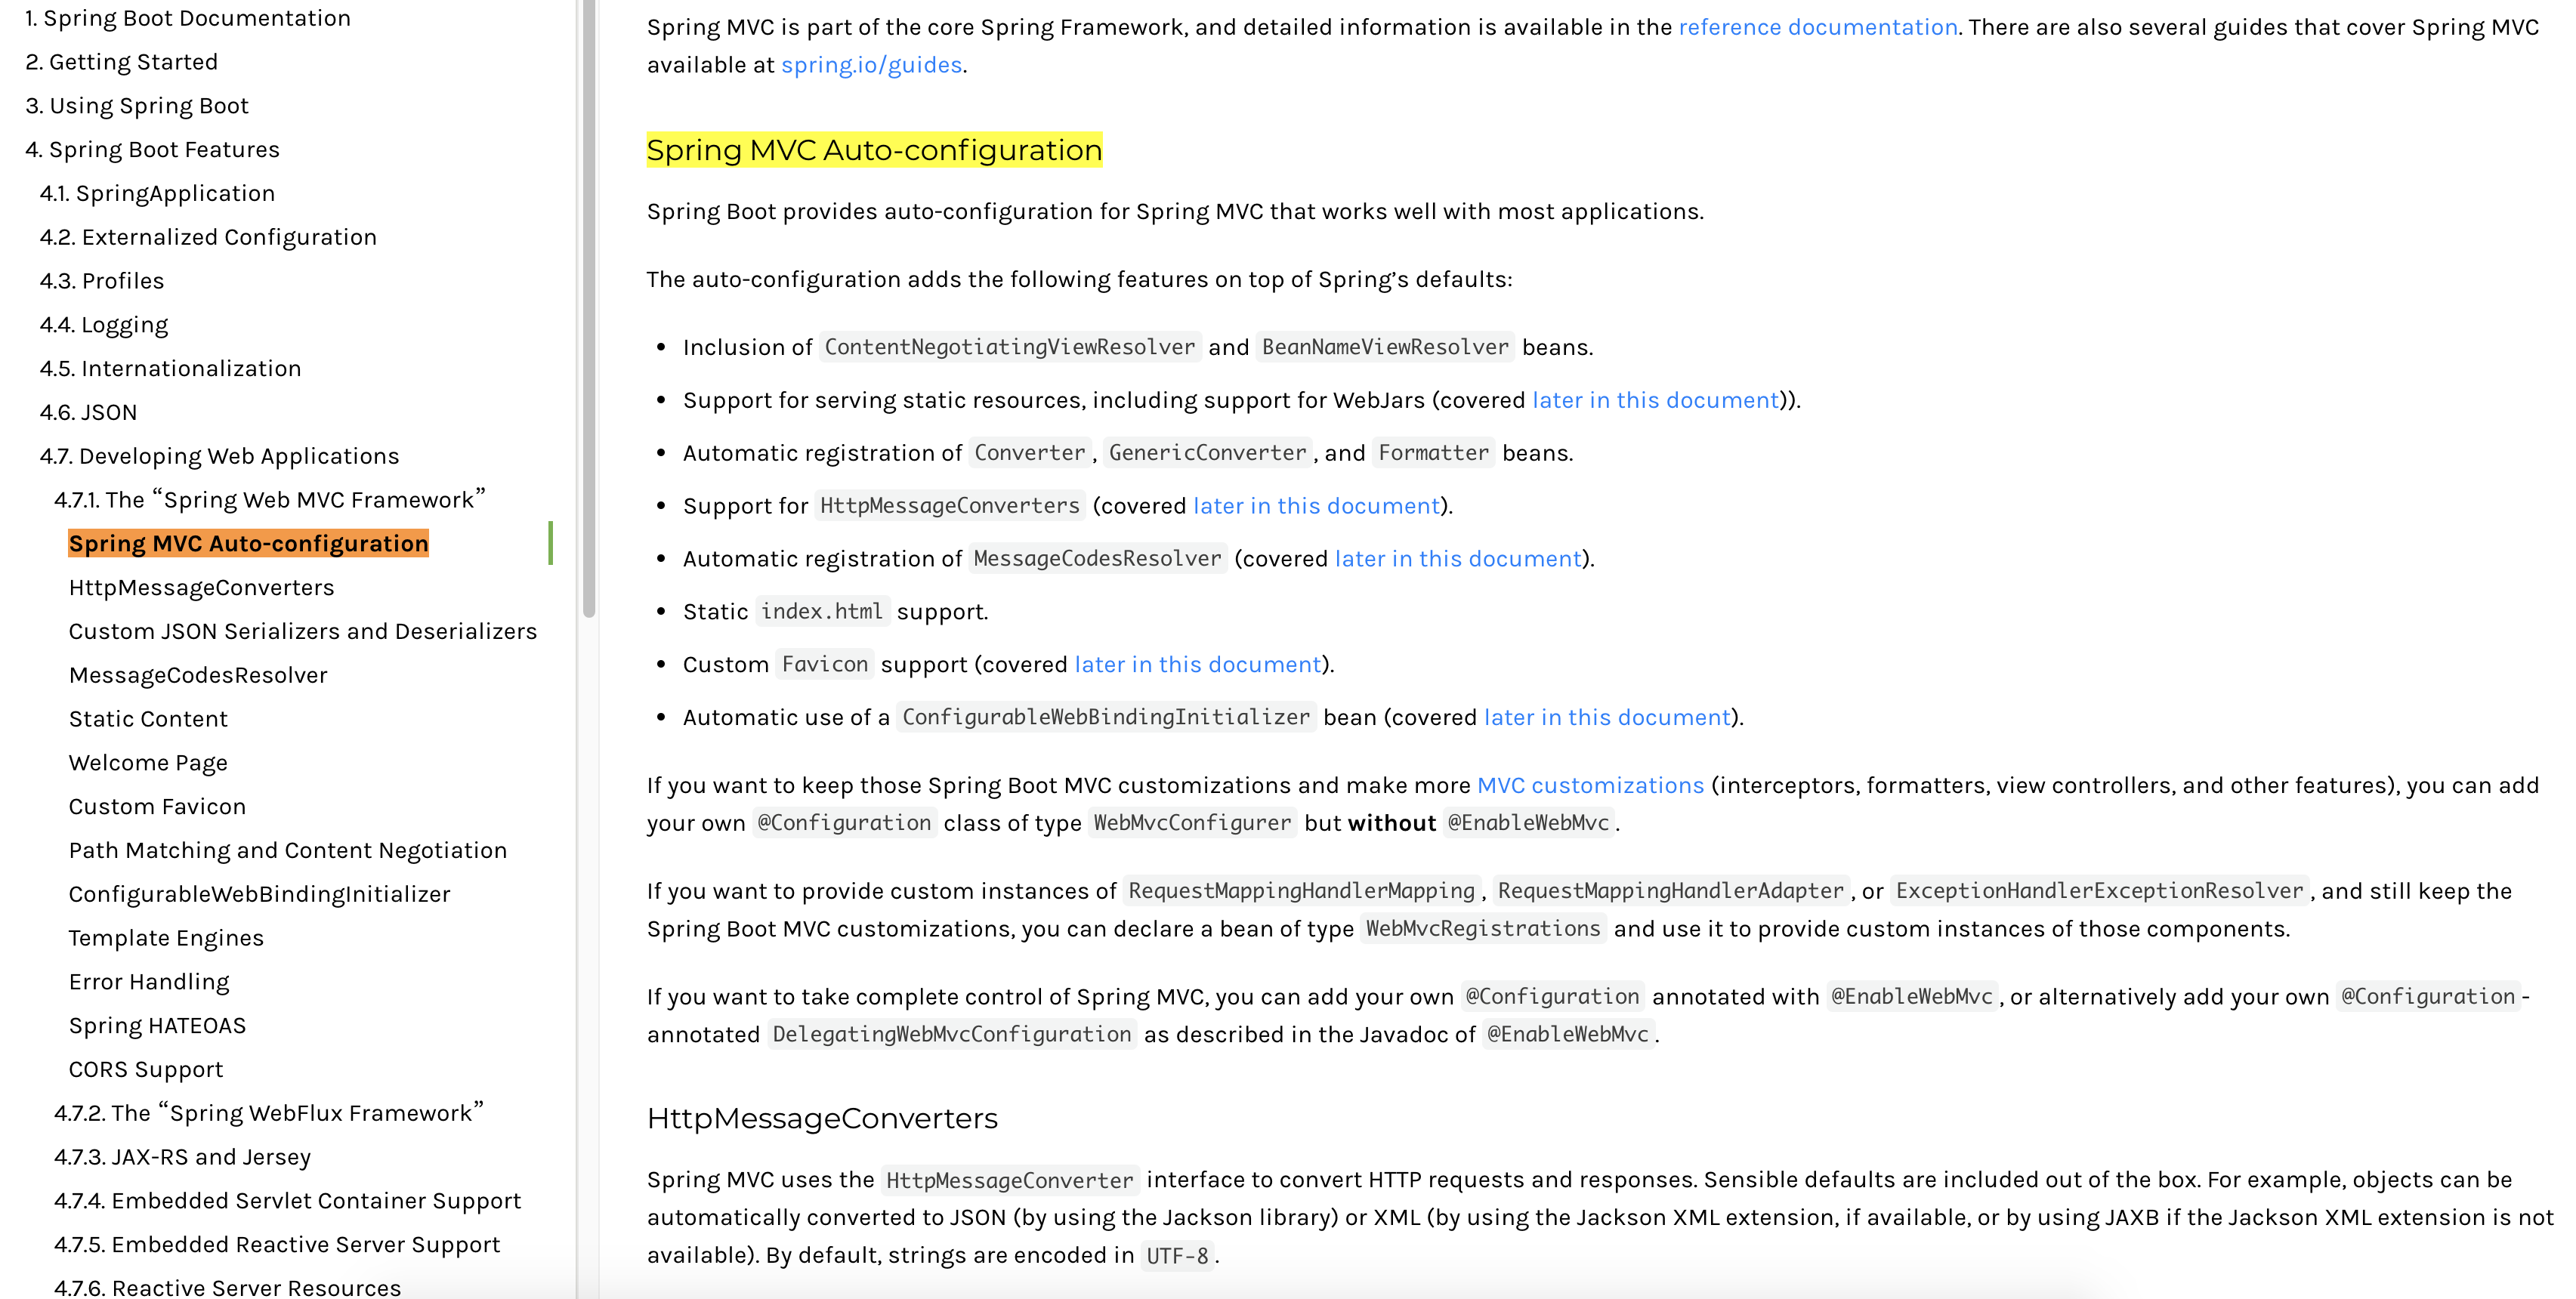
我们来解读下:
1 | Spring MVC Auto-configuration |
我们先分析下为什么加了@EnableWebMvc注解,视图解析器就不生效了,也就是说springmvc这一套东西都不好使了!这个很神奇
源码:
1 | // 如果这个bean不存在,这个类才生效!~ |
试图解析器
ContentNegotiatingViewResolver
1 |
|
解析视图名字
resolveViewName
1 |
|
既然他是从容器中加载所有的视图解析器,那么我们可以猜想,我们自己写一个视图解析器,也可以被 扫描并加载!
1 | // 自己写一个 bean |
flyway插件
一直知道这么个东西,很好用单独写一篇博客又显得很浪费;那就跟着这篇博客一并说了吧
概念:
Flyway是独立于数据库的应用、管理并跟踪数据库变更的数据库版本管理工具,说白了就是Flyway可以像Git管理不同人的代码那样,管理不同人的sql脚本,从而做到数据库同步
食用方法
如果新建项目可以直接勾选上flyway插件依赖,我们这里没勾选就自己手动添加:
- 添加依赖
1
2
3
4<dependency>
<groupId>org.flywaydb</groupId>
<artifactId>flyway-core</artifactId>
</dependency> - 配置
1
2
3
4
5
6
7
8
9
10
11
12# 默认不开启flyway
spring.flyway.enabled=false
spring.flyway.baseline-on-migrate=true
# flyway字符编码
spring.flyway.encoding=UTF-8
# flyway文件位置
spring.flyway.locations=classpath:db/migration
# ִV1__xxx.sql v开头默认执行一次
# R1__xxx 开头的脚本则会在项目启动时每次都会清除表后执行
spring.flyway.clean-disabled=false
# flyway 历史记录表
spring.flyway.table=flyway_schema_history - 新建文件夹
如下图 启动项目可以看到数据库中出现对应的flyway_schema_history表还有按脚本生成的表和数据,flyway_schema_history表中记录的脚本的变更历史
小结:至此springMvc的配置原理及flyway的使用我们已经了解了,代码撸起来吧!
- Title: springweb自动配置分析及flyway插件使用
- Author: viEcho
- Created at : 2021-04-23 19:55:09
- Updated at : 2024-01-18 15:07:58
- Link: https://viecho.github.io/2021/0423/springboot-auto-config.html
- License: This work is licensed under CC BY-NC-SA 4.0.