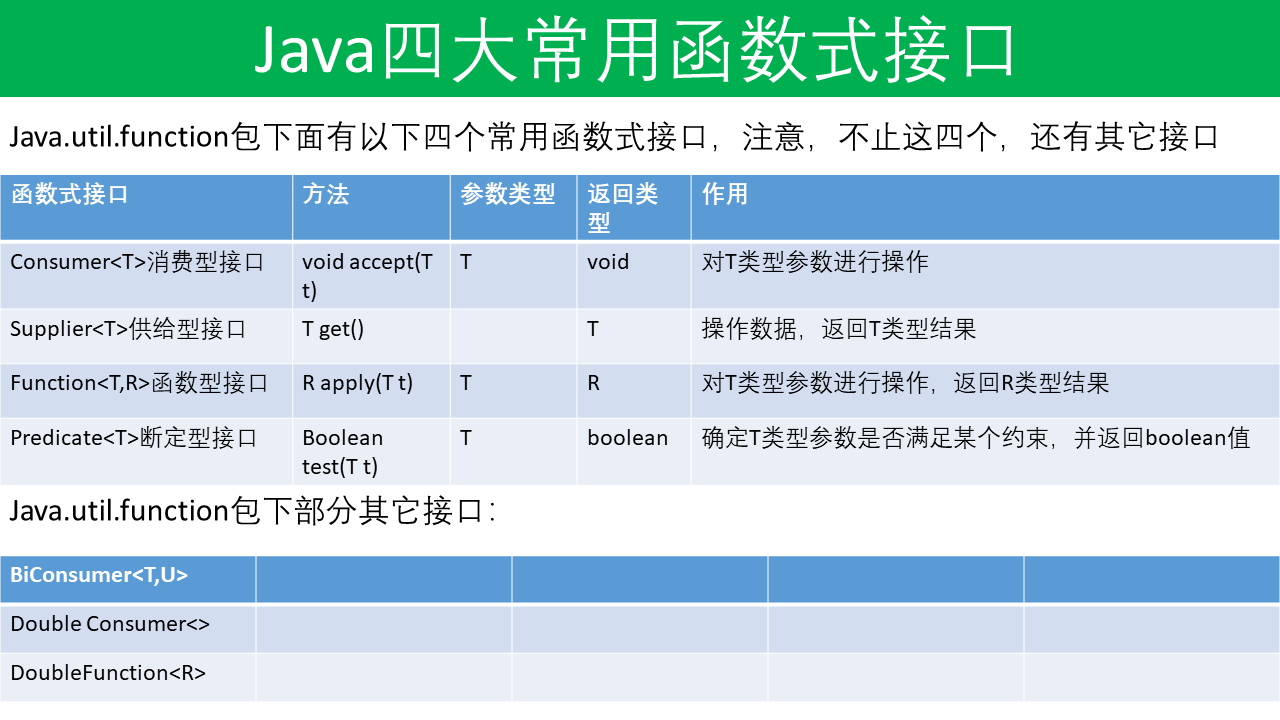
java8之4大函数式接口详解

java8之4大函数式接口详解

viEcho Lv5

前面博客说了要聊聊Java8 新特性来着,当然这个新是相对于7而言的哈,你要知道Java 都14了;本来想先写篇关于optional 的博客,翻开optional 类,发现都是函数式接口,所以咱们还是按顺序来,先来看看函数式接口Function;

function函数型接口 定义

我们先来看下以下代码:

1
2
3
4
5
6
7
8
9
10
11
12
13
14
15
16
package com.springstudy.testDemo;

import java.util.Arrays;
import java.util.List;
import java.util.function.Function;

public class FunTest {

public static void main(String[] args) {
List<String> languages = Arrays.asList("c++","java","");
Function<String, Integer> function = String::length;
languages.stream()
.map(function)
.forEach(System.out::println);
// 输出 3 , 4 ,0
}

以上代码,定义了一个流输出languages 每个元素的长度。为什么是这样的呢?我们带着问题一起来看下Function接口的源码

1
2
* @param <T> the type of the input to the function
* @param <R> the type of the result of the function

可以看到T是这个方法的输入类型,R是这个方法的输出类型,那我们同样可以这样让他返回一个判断的boolean 值;

1
2
3
4
5
6
Function<String, Boolean> function1 = String::isEmpty;
languages.stream()
.map(function1)
.forEach(System.out::println);
// 输出 false,false,true
}

好,接下来我们结合源码一个个验证它内部方法的作用:

  • 1.R apply(T t)
    接受一个T类型参数,执行对应返回类型为R的函数
    1
    2
    3
    4
    5
    Function<Integer,Integer> num2 = i-> i*2;
    Function<Integer,Integer> power = i -> i*i;

    System.out.println(num2.apply(3)); // 输出6
    System.out.println(power.apply(3)); // 输出9
    1. compose
      1
      2
      3
      4
      5
      6
      7
      8
      9
      10
      11
      12
      13
      14
      15
      System.out.println(num2.compose(power).apply(3)); // 输出18
      System.out.println(power.compose(num2).apply(3)); // 输出36

      // 源码如下:
      // default <V> Function<V, R> compose(Function<? super V, ? extends T> before) {
      // Objects.requireNonNull(before);
      // return (V v) -> apply(before.apply(v));
      // }

      // 从源码我们可以看到compose 传人一个不能null 的函数,紧接着执行了apply()方法 apply中先执行了传人的函数;
      // 那么我们拆解下num2.compose(power).apply(3)输出18的函数执行顺序:
      // power.apply(3)得 9 然后num2.apply(9)得18

      // 拆解下power.compose(num2).apply(3)输出36的函数执行顺序:
      // num2.apply(3)得 6 然后power.apply(6)得36
  • 3.andThen
    1
    2
    3
    4
    5
    6
    7
    8
    9
    10
    11
    12
    13
    14
    15
    System.out.println(num2.andThen(power).apply(3)); // 输出36
    System.out.println(power.andThen(num2).apply(3)); // 输出18
    // 源码如下
    // default <V> Function<T, V> andThen(Function<? super R, ? extends V> after) {
    // Objects.requireNonNull(after);
    // return (T t) -> after.apply(apply(t));
    // }

    // 哈哈,聪明如你看输出结果都应该猜出来 compose 和 andThen 函数执行顺序正好反过来了
    // 继续拆解:
    // num2.andThen(power).apply(3) 执行顺序:num2.apply(3)得6 然后power.apply(6)得36
    // power.andThen(num2).apply(3) 执行顺序:power.apply(3)得9 然后num2.apply(3)得18

    //其实源码里很多代码取名还有参数都很规范,基本上你看名字就知道代表的逻辑含义了
    //所以别再低头码砖,有时间撸一下源码逻辑,面向源码学习吧...
  • 4.identity
    1
    2
    3
    4
    5
    6
    7
    8
    9
    10
    11
    12
    13
    Stream<String> stream = languages.stream();
    Map<String, Integer> map = stream.collect(Collectors.toMap(str -> str, String::length));
    System.out.println(map); // 输出 {=0, c++=3, java=4}

    // 将str -> 表达式改写为Function.identity()
    Stream<String> stream1 = languages.stream();
    Map<String, Integer> map1 = stream1.collect(Collectors.toMap(Function.identity(), String::length));
    System.out.println(map1);

    可以看到str -> str 等效于Function.identity()
    //static <T> Function<T, T> identity() {
    // return t -> t;
    // }
    可见identity 方法返回一个同等的Function 函数,其实function函数式接口有点类似C++中指针的概念,变量可以指向一个函数方法,并且可以通过compose 和 andThen 可将函数联合起来使用,而identity这个static 方法可以获取到当前指向的方法!

Predicate

Predicate 断言函数式接口,所谓断言就是断定预言一个判定结果的意思

首先我们来看如下代码:

1
2
3
4
5
6
7
8
9
10
11
12
13
package testDemo;

import java.util.function.Predicate;

public class Pre {
public static void main(String[] args) {
Predicate<String> predicate1 = s -> s.equals("echo");

System.out.println(predicate1.test("Echo"));
// 输出 false
}
}

以上代码我们可以看到定义一个predicate1 断言函数,用于比较输入字符串是否和"echo"相等

可以看到返回false,是不是达到了和我们写if判断一样的效果;

同样我们带着好奇一起来看下其内部其他方法的定义及作用:

  • 1.and
1
2
3
4
5
6
7
8
9
10
11
System.out.println(predicate1.and(predicate2).test("Echo"));
// 输出 false

// 源码如下:
//default Predicate<T> and(Predicate<? super T> other) {
// Objects.requireNonNull(other);
// return (t) -> test(t) && other.test(t);
//}

// 从源码可以看出and 方法只是对两个断言函数做了 && 操作
// 上面代码执行顺序是predicate1.test("Echo") && predicate2.test(‘Echo)
  • 2.negate
1
2
3
4
5
6
7
8
 System.out.println(predicate1.negate().test("Echo"));
// 输出 true

// 源码如下:
//default Predicate<T> negate() {
// return (t) -> !test(t);
//}
// 从源码可以看出negate() 方法就是对断言函数进行取反
  • 3.or
1
2
3
4
5
6
7
8
9
10
11
// 聪明如你,肯定已经知道这个方法是 或 的关系了
System.out.println(predicate1.or(predicate2).test("Echo"));
// 输出 true

// 源码如下:
//default Predicate<T> or(Predicate<? super T> other) {
// Objects.requireNonNull(other);
// return (t) -> test(t) || other.test(t);
//}

// 从源码可以看出negate() 方法就是对断言函数进行取 或
  • 4.isEqual
1
2
3
4
5
6
7
8
9
10
11
12
13
14
15
16
17
18
Predicate<Object> im_echo = Predicate.isEqual("im_echo");
System.out.println(im_echo.test("im_echo"));
// 输出 true

// 源码如下:
//static <T> Predicate<T> isEqual(Object targetRef) {
// return (null == targetRef)
// ? Objects::isNull
// : object -> targetRef.equals(object);
//}

// 可以看到内部是一个三目运算,比较目标值和原值是否相等
// 这样乍一看这方法和Predicate<String> predicate1 = s -> s.equals("echo"); 有啥区别啊?
// 哈哈,其实不然。我们常规的判断前面值需要先判断x!=null 然后再x.equals(xxx)
// Predicate.isEqual(x).test(xxx) 则完全不需要判空,而上面自己写equals 实在有点啰嗦了

System.out.println(Predicate.isEqual(null).test("xxx"));
// 输出 false

Supplier & Consumer

四大函数式接口已经总结了两个了,还有剩余的供给型接口Supplier 和消费型接口Consumer
我习惯称其为生产者和消费者接口类,感觉这样更好理解点;顾名思义,生产只管定义加工产出,消费只管使用!

废话不多说,我们继续还是来看以下代码:

1
2
3
4
5
6
7
8
9
10
11
12
13
14
15
16
17
18
19
20
21
22
23
24
25
26
27
28
29
30
31
32
33
34
35
36
37
package testDemo;

import java.util.Arrays;
import java.util.HashMap;
import java.util.Map;
import java.util.function.Consumer;
import java.util.function.Predicate;
import java.util.function.Supplier;

public class ConsumerAndSupplier {
public static void main(String[] args) {
String hello = "hello,java8";
Consumer<String> consumer1 = con -> System.out.println(con.toUpperCase());
consumer1.accept(hello);
// 输出 HELLO,JAVA8

Consumer<String> consumer2 = con -> System.out.println(Arrays.toString(con.split(",")));
consumer2.accept(hello);
// 输出 [hello, java8]

consumer2.andThen(consumer1).accept(hello);
// 输出 [hello, java8] 、HELLO,JAVA8

// andThen 源码如下:
// default Consumer<T> andThen(Consumer<? super T> after) {
// Objects.requireNonNull(after);
// return (T t) -> { accept(t); after.accept(t); };
// }
// 可以看到andThen(Consumer<? super T> after) 参数是后执行的
// 也就是和 function的andThen方法是一样的 都是从前往后顺序执行的

Supplier<String> supplier1 = () -> hello;
System.out.println(supplier1.get());
// 输出 hello,java8
}
}

从以上代码我们基本知道了Consumer 和 Supplier函数接口的用法,那你说他们是对应的,何以体现呢?

我们继续来看下面的代码:

1
2
3
4
5
6
7
8
9
10
11
12
Map<String,Object> userMap = new HashMap<>(16);
userMap.put("id","1");
userMap.put("name","echo");
Consumer<Map<String,Object>> consumerMap = map -> {
if (Predicate.isEqual(map.get("id")).test("1")){
map.put("name","hello,echo!");
}
};
consumerMap.accept(userMap);
Supplier<Map<String,Object>> supplierMap = () -> userMap;
System.out.println(supplierMap.get());
// 输出 {name=hello,echo !, id=1}

小结:
其实源码很简单,只要你去看基本都能看懂;对于复杂的源码,其实我们只需要梳理对应的逻辑就好,无需面面俱到!
为什么要看函数式接口的源码呢?是因为 java8 之后的版本源码里面基本都是lambda表达式+stream流,而这两个里面就是函数式接口的具体应用!而用的最多的就是4大函数式接口,所以理解它对于我们后面阅读源码很有必要!

  • Title: java8之4大函数式接口详解
  • Author: viEcho
  • Created at : 2021-04-23 19:55:09
  • Updated at : 2024-01-18 14:48:31
  • Link: https://viecho.github.io/2021/0423/java8-4-function-interface.html
  • License: This work is licensed under CC BY-NC-SA 4.0.
Comments
On this page
java8之4大函数式接口详解